
Siemens Hipath 4000 (CDR Standard Format)
Данные и Параметры соединения ниже соответствуют только программе Advanced PBX Data Logger и могут быть не применимы для других программных продуктов.
Configuring PBX settings
Note: There is a lot of configuration options on Hipath 4000 for CDR. The following AMOS' are used (and more besides but these are the main ones):
- DAGR - sizes of files for storage.
- FEACG - circular or stop of records on hard disk.
- DAVF - currency on output.
- GEFE/GRZU - carrier selection.
- FBTN - assign numbers to each trunk that you wish to be shown in the output.
- GEZU - output to which device.
- SELG - what mask is used for outputting to what device and for what calls.
- SELS - the output on/off/collect.
- TLZO - output of a dummy number for incoming/outgoing/internal calls.
- FTBL - the main area where the output 'mask' or line of text is decided, normally one for incoming and one for outgoing.
- TEXT - the textual outputs that you are going to use for different occurrences on the system.
If you have access to a working system where the call charging is setup then you might be able to copy out the relevant information, however we would recommend that you contact your service provider and get them to turn it on for you.
USE COMMANDS BELOW AT YOUR OWN RISK!
Activate CDR output
Connect to your PBX using your admin console
Type in DIS-LSSM; It will show you what is active or not. If there is nothing showing up on the CDR port 1202 then DIS-SELS; Which ever one is set to ON example 1 then
DEA-SELS:1;
ACT-SELS:1;
Then display again DIS-LSSM;
Configuring PBX settings (advanced)
Configure output device
ADD-GEZU:TTY,DEV2,TTY,TERM2;
Activate output capture subroutines
ADD-FEACG:CDRCDUMP&CDRCDIS;
Configure CDR format
REGENERATE-FTBL:1;
ADD-FTBL:1,B,FORM,1,N,"## #@/#@/#@ #@:#@ #@:#@:#@ ####@ #@@@@@@@@@@@@@@ #";
ADD-FTBL:1,B,FORM,2,N,"@@@@@@@@@@@@@@@@@@@@@ #@@@@@@@@@@@@@@ #@@@@ #@@@ #";
ADD-FTBL:1,B,FORM,3,N,"@@@ #@@@@@ #@@@@@@@@@@@";
ADD-FTBL:1,B,CTRL,4,N,CR;
ADD-FTBL:1,B,CTRL,5,Y,LF;
ADD-FTBL:1,B,FIELD,1,SERVICE,CHAR,"0",L;
ADD-FTBL:1,B,FIELD,2,STNID,CHAR,"0",L;
ADD-FTBL:1,B,FIELD,3,STMONTH,CHAR,"0",R;
ADD-FTBL:1,B,FIELD,4,STDAY,CHAR,"0",R;
ADD-FTBL:1,B,FIELD,5,STYEAR,CHAR," ",R;
ADD-FTBL:1,B,FIELD,6,STHOUR,CHAR,"0",R;
ADD-FTBL:1,B,FIELD,7,STMIN,CHAR,"0",R;
ADD-FTBL:1,B,FIELD,8,CONHOUR,CHAR,"0",R;
ADD-FTBL:1,B,FIELD,9,CONMIN,CHAR,"0",R;
ADD-FTBL:1,B,FIELD,10,CONSEC,CHAR,"0",R;
ADD-FTBL:1,B,FIELD,11,COPIN,CHAR," ",L;
ADD-FTBL:1,B,FIELD,12,DESTPID,CHAR," ",L;
ADD-FTBL:1,B,FIELD,13,EXPENS,CHAR," ",L;
ADD-FTBL:1,B,FIELD,14,SUPLSERV,CHAR,"0",L;
ADD-FTBL:1,B,FIELD,15,CALLIPTY,CHAR," ",L;
ADD-FTBL:1,B,FIELD,16,DESTPTY,CHAR," ",L;
ADD-FTBL:1,B,FIELD,17,RTIONPTY,CHAR," ",L;
ADD-FTBL:1,B,FIELD,18,ROUTCN,CHAR," ",L;
ADD-FTBL:1,B,FIELD,19,TKNOREAL,CHAR," ",L;
ADD-FTBL:1,B,FIELD,20,INTNREAL,CHAR," ",L;
ADD-FTBL:1,B,FIELD,21,ACCTCODE,CHAR," ",L;
ADD-FTBL:1,B,FIELD,22,PIN,CHAR," ",L;
Configure Select Group
The following commands configure CDR logging for incoming, outgoing and internal calls
DEL-SELG:1;
ADD-SELG:SELG,1,N,DEV2,NODEV,1,0;
CHANGE-SELG:SELT,1,1,FORM01,NOFORM,NOCALC,"A22",,,,,,,,,, ,,,,,,,,,,,,,,,,,,,,,,,;
CHANGE-SELG:SELT,1,1,,,,,0&&999999,,,,,,,,,,,,,,,,,,,,,,, ,,,,,,,,,;
CHANGE-SELG:SELT,1,1,,,,,,VOICE,,,,,,,,,,,,,,,,,,,,,,,,,, ,,,,,;
CHANGE-SELG:SELT,1,1,,,,,,,0&&15,,,,,,,,,,,,,,,,,,,,,,,,, ,,,,,;
CHANGE-SELG:SELT,1,1,,,,,,,,ALL,ALL,N,N,Y,N,N,N,N,N,N,N,N ,N,N,N,N,N,N,,,,,,,,,,,;
CHANGE-SELG:SELT,1,1,,,,,,,,,,,,,,,,,,,,,,,,,,,0,000001,, ,,,,,,,;
CHANGE-SELG:SELT,1,1,,,,,,,,,,,,,,,,,,,,,,,,,,,,,0&&999,0 &&254,0&&30,,,,,,;
CHANGE-SELG:SELT,1,1,,,,,,,,,,,,,,,,,,,,,,,,,,,,,,,,N,N,INTERN&INCO&OUTG,0&&8,0&&9,ALL;
Activate Select Group
ACT-SELS:1;
Connecting to the PBX
Default IP address: 192.0.2.3
Default IP port: 1202
The compputer with our logger should be in the same sub-network.
You should see the ##### banner and then call charging in the logger's windows.
Настройка логгера в режиме TCP клиента
Наша программа должна работать в режиме TCP клиента. Это означает, что логгер сам инициирует подключение с АТС, которая работает в режиме сервера. Добавьте один или несколько IP адресов вашей АТС (Siemens Hipath 4000 [CDR Standard Format]). Номер порта должен соответствовать номеру порта, установленному в настройках АТС или производителем (в этом примере - 1202).
1. Добавьте новую конфигурацию с источником данных типа TCP, если не сделали это ранее.
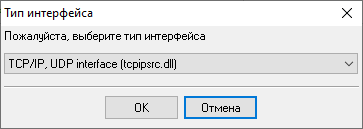
2. Настройте параметры TCP подключения как показано ниже.
![Режим TCP клиента - Siemens Hipath 4000 [CDR Standard Format]](/pbx/shared/tcp-client-mode.png)
192.168.1.220
1202
192.168.1.220:1202
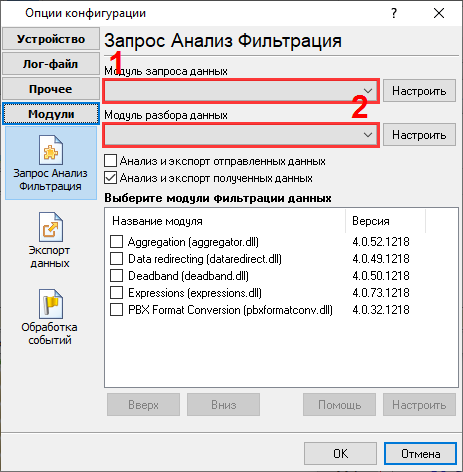
Выбор правильного модуля-парсера для Siemens Hipath 4000 (CDR Standard Format)
Siemens Hipath 4000 (CDR Standard Format)
Siemens Hipath 4000 (CDR Standard Format)
Данные, извлекаемые PBX Data Logger
| Описание | Тип данных | Имя колонки |
|---|---|---|
| Служба | string | FLAG1 |
| Станция ID | string | FLAG2 |
| Время звонка | datetime | CALL_TIME |
| Длительность звонка | datetime | CALL_DURATION |
| Длительность звонка (с) | integer | CALL_DURATION_S |
| Class of PIN | string | FLAG3 |
| Конечный party ID | string | FLAG4 |
| Expensive connection | string | FLAG5 |
| Supplementary Служба ID | string | FLAG6 |
| Тип звонка | string | CALL_TYPE |
| Направление | string | DIRECTION |
| Расширение | string | EXT |
| Route code | string | FLAG7 |
| Вызывающий телефон | string | CALLER_PHONE |
| Набранный номер | string | DIALED_PHONE |
| Линия | string | TRUNK |
| Код абонента | string | ACC |
Интересуют отчеты об использовании АТС?
С нашей утилитой PBX Reports вы получаете варианты отчетности - ручные, запланированные и по email, встроенный веб-сервер и другие функции. Настройте свою систему учета вызовов для Siemens Hipath 4000 (CDR Standard Format). Попробуйте нашу программу PBX Reports с отчетами
Нужна история звонков в базе данных?
Прием и экспорт данных SMDR или CDR в реальном времени в вашу базу данных является стандартной функцией нашего программного обеспечения. Посмотрите нашу статью о записи истории звонков в базу данных
Похожие на Siemens Hipath 4000 АТС
Siemens Hicom-350HSiemens Hicom-300H
Siemens Hipath 4000 (CDRE)
Siemens Hipath 4000
Быстрый переход к настройкам подключения для других АТС и форматов данных ↴
Замечание: Продукты и компании, указанные здесь используются только для обозначения и идентификации, и могут быть торговыми и/или зарегистрированными марками соответствующих компаний.
Advanced PBX Data Logger, связанные темы:
здесьПоследовательный интерфейс RS232 разводка и сигналы Кабели и сигналы Кабели мониторинга данных