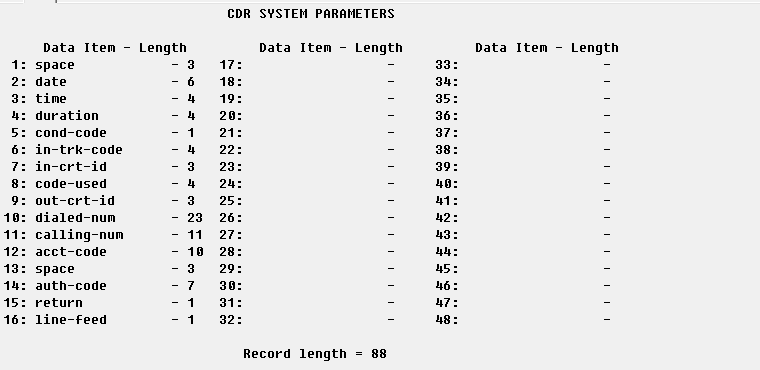
Avaya Communication Manager (Customized Output Format ACM 6.3+). Параметры соединения и формат данных SMDR/CDR


Данные ниже соответствуют только программе Advanced PBX Data Logger и могут быть не применимы для других программных продуктов.

Configuring ACM

System parameters

  1. Type change system-parameters cdr. Press Enter.
  2. The CDR System Parameters screen appears.
  3. In the Primary Output Format field, select customized.
  4. In the CDR Date Format field, select day/month.
  5. On the page #2 define CDR fields descriptions as on the figure above.

IP services - Client mode (Preferred)

The PBX can also work in the TCP client mode. You may use this mode instead of the TCP server mode.

  1. Type list node-names all.
  2. Press Enter.
  3. Add a new node with the following settings.
  4. Type - IP
  5. Name - pbxlogger
  6. IP Address - 192.168.10.33 (this is the IP address where Advanced PBX Data Logger is installed. The computer with the logger must have a static IP address)
  1. Type display ip-services.
  2. Press Enter.
  3. Verify or change the settings for the CDR1 service.
  4. Enabled - Y.
  5. Reliable Protocol - N.
  6. Local port - 0.
  7. Remote node - pbxlogger.
  8. Remote port - 5555.

IP services - Server mode

  1. Type display ip-services.
  2. Press Enter.
  3. Verify the settings for the CDR1 service.
  4. Enabled - Y.
  5. Reliable Protocol - N.
  6. The following suggested settings instruct the PBX to work in the TCP Server mode.
  7. Local port - 5555 (you may use any other port number above 1024. But you must specify the same port number in Advanced PBX Data Logger).
  8. Remote node - Any.
  9. Remote port - 0.

Avaya Communication Manager (ACM) 6.3 and higher. Customized format.

This parser is designed for the following customized format.

Customized Output Format

Date format

The parser expects date in MMDDYY format (month/day/year).

Configuring ACM

System parameters

  1. Type change system-parameters cdr. Press Enter.
  2. The CDR System Parameters screen appears.
  3. In the Primary Output Format field, select customized.
  4. In the CDR Date Format field, select day/month.
  5. On the page #2 define CDR fields descriptions as on the figure above.

IP services - Client mode (Preferred)

The PBX can also work in the TCP client mode. You may use this mode instead of the TCP server mode.

  1. Type list node-names all.
  2. Press Enter.
  3. Add a new node with the following settings.
  4. Type - IP
  5. Name - pbxlogger
  6. IP Address - 192.168.10.33 (this is the IP address where Advanced PBX Data Logger is installed. The computer with the logger must have a static IP address)
  1. Type display ip-services.
  2. Press Enter.
  3. Verify or change the settings for the CDR1 service.
  4. Enabled - Y.
  5. Reliable Protocol - N.
  6. Local port - 0.
  7. Remote node - pbxlogger.
  8. Remote port - 5555.

IP services - Server mode

  1. Type display ip-services.
  2. Press Enter.
  3. Verify the settings for the CDR1 service.
  4. Enabled - Y.
  5. Reliable Protocol - N.
  6. The following suggested settings instruct the PBX to work in the TCP Server mode.
  7. Local port - 5555 (you may use any other port number above 1024. But you must specify the same port number in Advanced PBX Data Logger).
  8. Remote node - Any.
  9. Remote port - 0.

Настройка логгера в режиме TCP клиента

Наша программа должна работать в режиме TCP клиента. Это означает, что логгер сам инициирует подключение с АТС, которая работает в режиме сервера. Добавьте один или несколько IP адресов вашей АТС ((none)). Номер порта должен соответствовать номеру порта, установленному в настройках АТС или производителем (в этом примере - 5555).

1. Добавьте новую конфигурацию с источником данных типа TCP, если не сделали это ранее.

Тип интерфейса TCP/IP

2. Настройте параметры TCP подключения как показано ниже.

Режим TCP клиента - Avaya CM

192.168.1.220

5555

192.168.1.220:5555

Настройка Advanced PBX Data Logger как TCP сервер

PBX Data Logger должен быть настроен в режиме TCP сервера и прослушивать адрес 0.0.0.0:5555 (см. ниже). IP адрес 0.0.0.0 позволяет принимать данные по всех сетевым интерфейсам на компьютере. Номер порта должен соответствовать номеру порта, установленному в настройках АТС или производителем.

1. Добавьте новую конфигурацию с источником данных типа TCP (если не сделали это прежде).

TCP/IP Data Interface

2. Настройте параметры TCP подключения как показано ниже.

TCP Server Mode for Avaya CM

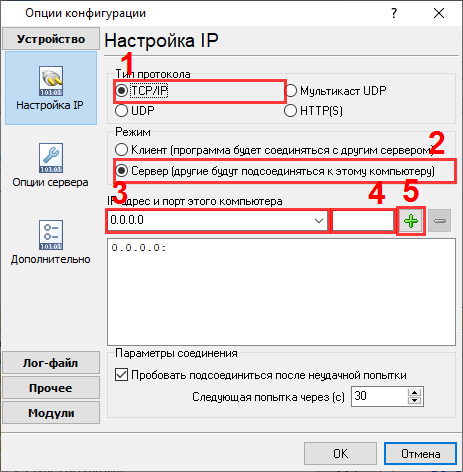
5555

5555

Выбор правильного модуля-парсера для Avaya Communication Manager (Customized Output Format ACM 6.3+)

Выбор парсера для (none)

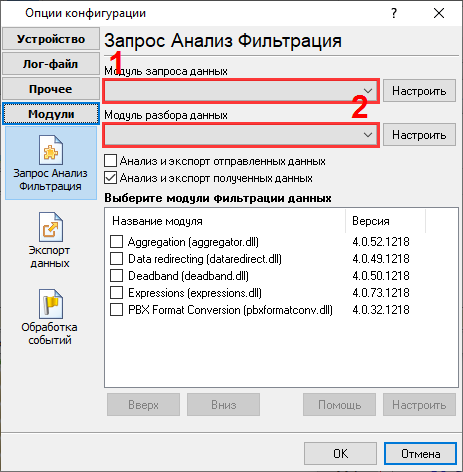
Avaya Communication Manager (Customized Output Format ACM 6.3+)

Avaya Communication Manager (Customized Output Format ACM 6.3+)

Данные, извлекаемые PBX Data Logger

ОписаниеТип данныхИмя колонки
Время звонкаdatetimeCALL_TIME
Длительность звонка (с)integerCALL_DURATION_S
Длительность звонкаdatetimeCALL_DURATION
Condition codestringCALL_TYPE
НаправлениеstringDIRECTION
Incoming Линия codestringTRUNK
Incoming circuit IDstringFLAG4
Access code usedstringFLAG1
Outgoing circuit IDstringFLAG5
Набранный номерstringDIALED_PHONE
Вызывающий телефонstringCALLER_PHONE
РасширениеstringEXT
Acount codestringACC
Код авторизацииstringAUTH

Интересуют отчеты об использовании АТС?

Мы предлагаем утилиту PBX Reports с разнообразными ручными и автоматизированными отчетами, с возможностью вывода на печать, в файлы Excel или PDF, или отправкой по электронной почте, встроенный веб-сервер, и другие возможности. Смотрите тут

Нужна история звонков в базе данных?

Это стандартная функция нашего логгер, который получает и экспортирует данные SMDR или CDR в реальном времени в вашу базу данных. Проследуйте по ссылке

Замечание: Продукты и компании, указанные здесь используются только для обозначение и идентификации и могут быть торговыми и/или зарегистрированными марками соответствующих компаний.