Avaya Communication Manager (Customized Output Format ACM 6.3+)
Данные и Параметры соединения ниже соответствуют только программе Advanced PBX Data Logger и могут быть не применимы для других программных продуктов.
Configuring ACM
System parameters
- Type change system-parameters cdr. Press Enter.
- The CDR System Parameters screen appears.
- In the Primary Output Format field, select customized.
- In the CDR Date Format field, select day/month.
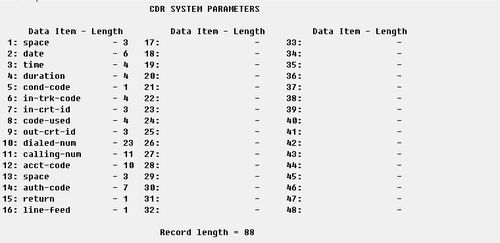
- On the page #2 define CDR fields descriptions as on the figure above.
IP services - Client mode (Preferred)
The PBX can also work in the TCP client mode. You may use this mode instead of the TCP server mode.
- Type list node-names all.
- Press Enter.
- Add a new node with the following settings.
- Type - IP
- Name - pbxlogger
- IP Address - 192.168.10.33 (this is the IP address where Advanced PBX Data Logger is installed. The computer with the logger must have a static IP address)
- Type display ip-services.
- Press Enter.
- Verify or change the settings for the CDR1 service.
- Enabled - Y.
- Reliable Protocol - N.
- Local port - 0.
- Remote node - pbxlogger.
- Remote port - 5555.
IP services - Server mode
- Type display ip-services.
- Press Enter.
- Verify the settings for the CDR1 service.
- Enabled - Y.
- Reliable Protocol - N.
- The following suggested settings instruct the PBX to work in the TCP Server mode.
- Local port - 5555 (you may use any other port number above 1024. But you must specify the same port number in Advanced PBX Data Logger).
- Remote node - Any.
- Remote port - 0.
Avaya Communication Manager (ACM) 6.3 and higher. Customized format.
This parser is designed for the following customized format.
Date format
The parser expects date in MMDDYY format (month/day/year).
Настройка логгера в режиме TCP клиента
Наша программа должна работать в режиме TCP клиента. Это означает, что логгер сам инициирует подключение с АТС, которая работает в режиме сервера. Добавьте один или несколько IP адресов вашей АТС (Avaya). Номер порта должен соответствовать номеру порта, установленному в настройках АТС или производителем (в этом примере - 5555).
1. Добавьте новую конфигурацию с источником данных типа TCP, если не сделали это ранее.
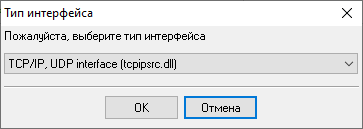
2. Настройте параметры TCP подключения как показано ниже.
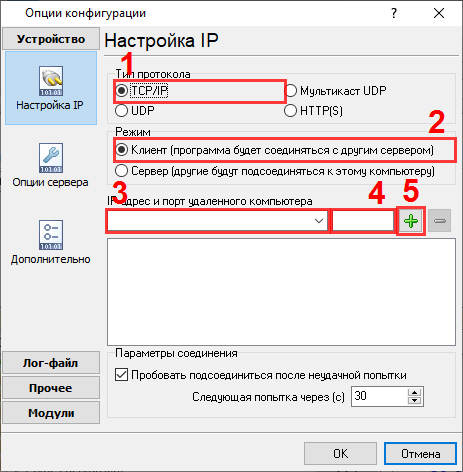
192.168.1.220
5555
192.168.1.220:5555
Настройка Advanced PBX Data Logger как TCP сервер
PBX Data Logger должен быть настроен в режиме TCP сервера и прослушивать адрес 0.0.0.0:5555 (см. ниже). IP адрес 0.0.0.0 позволяет принимать данные по всех сетевым интерфейсам на компьютере. Номер порта должен соответствовать номеру порта, установленному в настройках АТС или производителем.
1. Добавьте новую конфигурацию с источником данных типа TCP (если не сделали это прежде).

2. Настройте параметры TCP подключения как показано ниже.
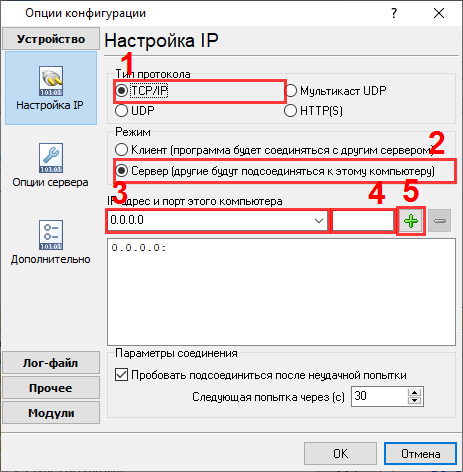
5555
5555
Выбор правильного модуля-парсера для Avaya Communication Manager (Customized Output Format ACM 6.3+)
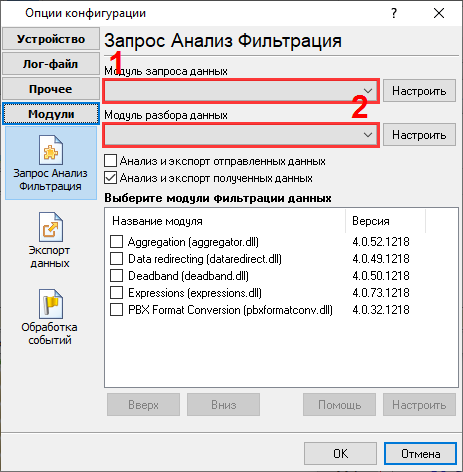
Avaya Communication Manager (Customized Output Format ACM 6.3+)
Avaya Communication Manager (Customized Output Format ACM 6.3+)
Данные, извлекаемые PBX Data Logger
| Описание | Тип данных | Имя колонки |
|---|---|---|
| Время звонка | datetime | CALL_TIME |
| Длительность звонка (с) | integer | CALL_DURATION_S |
| Длительность звонка | datetime | CALL_DURATION |
| Condition code | string | CALL_TYPE |
| Направление | string | DIRECTION |
| Incoming Линия code | string | TRUNK |
| Incoming circuit ID | string | FLAG4 |
| Access code used | string | FLAG1 |
| Outgoing circuit ID | string | FLAG5 |
| Набранный номер | string | DIALED_PHONE |
| Вызывающий телефон | string | CALLER_PHONE |
| Расширение | string | EXT |
| Код абонента | string | ACC |
| Код авторизации | string | AUTH |
Интересуют отчеты об использовании АТС?
Наша утилита PBX Reports предлагает различные ручные, запланированные и email-отчеты, включает встроенный веб-сервер и многое другое. Вы можете настроить свою систему учета вызовов для Avaya Communication Manager (Customized Output Format ACM 6.3+). Попробуйте нашу программу PBX Reports с отчетами
Нужна история звонков в базе данных?
Наша программа-логгер, по умолчанию, фиксирует и экспортирует данные SMDR или CDR в реальном времени, отправляя их в вашу базу данных. Посмотрите нашу статью о записи истории звонков в базу данных
Похожие на Avaya Communication Manager АТС
Быстрый переход к настройкам подключения для других АТС и форматов данных ↴
Замечание: Продукты и компании, указанные здесь используются только для обозначения и идентификации, и могут быть торговыми и/или зарегистрированными марками соответствующих компаний.
Advanced PBX Data Logger, связанные темы:
здесьПоследовательный интерфейс RS232 разводка и сигналы Кабели и сигналы Кабели мониторинга данных
